
Introduction#
GitHub private this note shows
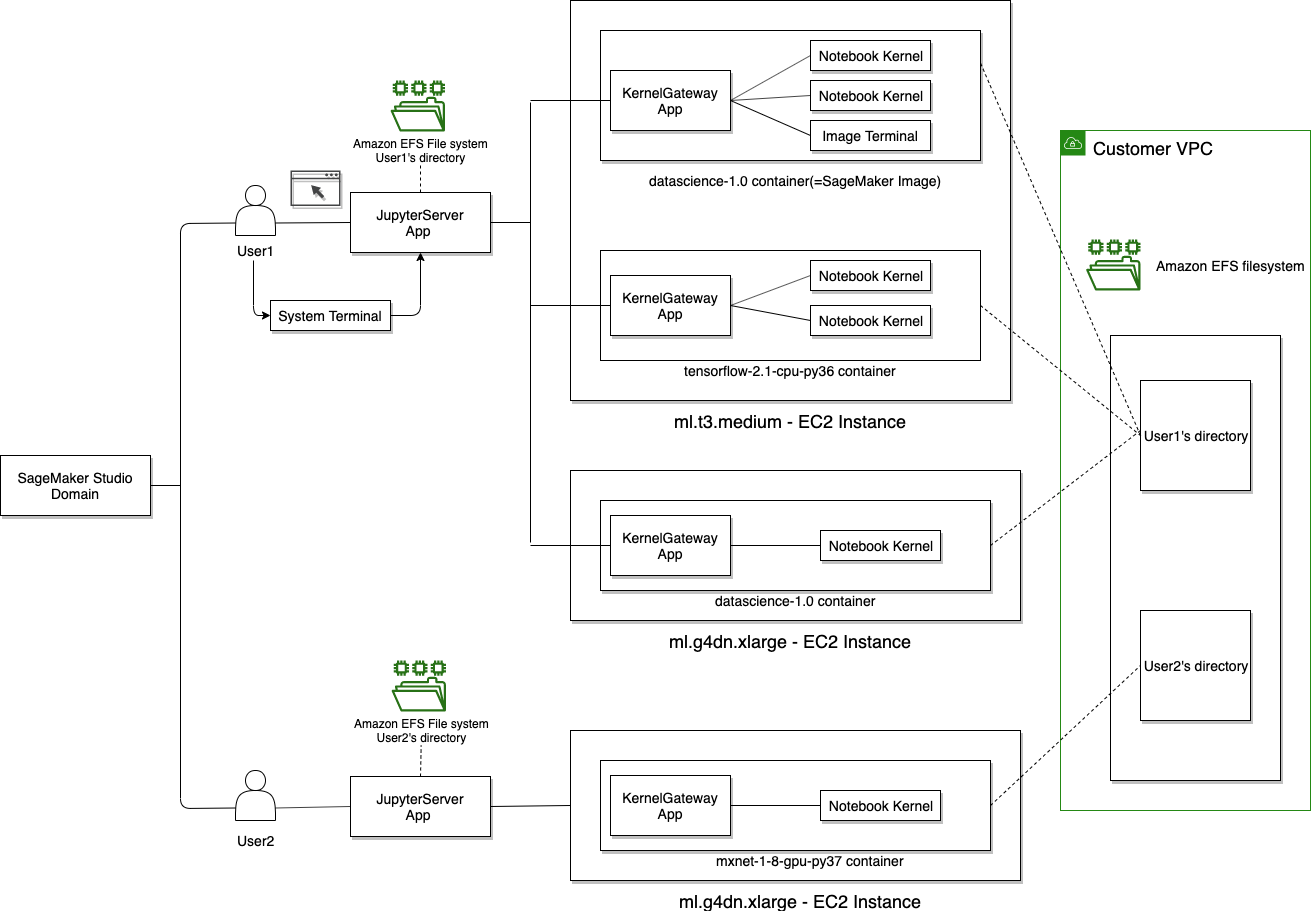
- Understand SageMakers studio infrastructure
- Create domain, user profile, apps
- Manage access control via IAM and studiouserid tag
- Configure life cycle configuration for domain, and user
SageMaker Studio#
There are basic concepts
- domain
- user profile
- share location
- apps
Data Scientist#
- Turn on sourceIdentity
- Tag the User Profile in SageMaker domain
- Create a Role, and IAM user for DS from SageMaker console
Tag the user profile in a domain using studiouserid for key and user profile name for value
{"Version": "2012-10-17","Statement": [{"Sid": "AmazonSageMakerPresignedUrlPolicy","Effect": "Allow","Action": ["sagemaker:CreatePresignedDomainUrl"],"Resource": "*","Condition": {"StringEquals": {"sagemaker:ResourceTag/studiouserid": "${aws:username}"}}}]}
Create a role which will be assumed by the DS IAM user. To enable the DS to launch studio which attached to a user profile, we need to setup IAM policy: 1) using tab studiouserid or 2) arn resource. Let create an IAM policy for DS and use studiouserid
{"Version": "2012-10-17","Statement": [{"Effect": "Allow","Action": ["sagemaker:CreateApp","sagemaker:CreateAppImageConfig","sagemaker:UpdateAppImageConfig","sagemaker:DeleteApp","sagemaker:DeleteAppImageConfig","sagemaker:DescribeApp","sagemaker:DescribeAppImageConfig","sagemaker:DescribeDomain","sagemaker:DescribeUserProfile"],"Resource": ["*"]},{"Effect": "Allow","Action": ["sagemaker:CreatePresignedDomainUrl"],"Resource": ["*"],"Condition": {"StringEquals": {"sagemaker:ResourceTag/studiouserid": "default-1684815788251"}}},{"Effect": "Allow","Action": ["sagemaker:ListApps","sagemaker:ListAppImageConfigs","sagemaker:ListDomains","sagemaker:ListUserProfiles","sagemaker:ListSpaces"],"Resource": "*"}]}
It is possible to control access by resource arn
{"Version": "2012-10-17","Statement": [{"Effect": "Allow","Action": ["sagemaker:CreateApp","sagemaker:CreateAppImageConfig","sagemaker:UpdateAppImageConfig","sagemaker:DeleteApp","sagemaker:DeleteAppImageConfig","sagemaker:DescribeApp","sagemaker:DescribeAppImageConfig","sagemaker:DescribeDomain","sagemaker:DescribeUserProfile"],"Resource": ["*"]},{"Effect": "Allow","Action": ["sagemaker:CreatePresignedDomainUrl"],"Resource": ["arn:aws:sagemaker:ap-southeast-1:014600194779:domain/d-5uqevrcgia9q","arn:aws:sagemaker:ap-southeast-1:014600194779:user-profile/d-rmxdg2gitvsb/default-1684815788251"]},{"Effect": "Allow","Action": ["sagemaker:ListApps","sagemaker:ListAppImageConfigs","sagemaker:ListDomains","sagemaker:ListUserProfiles","sagemaker:ListSpaces"],"Resource": "*"}]}
Please take note the trust policy for the DS Role
{"Version": "2012-10-17","Statement": [{"Effect": "Allow","Principal": {"Service": "sagemaker.amazonaws.com"},"Action": "sts:AssumeRole"},{"Effect": "Allow","Principal": {"AWS": "arn:aws:iam::014600194779:user/da"},"Action": "sts:AssumeRole"}]}
Life Cycle Configuration#
There are two common use cases
- Install some libraries => target KernelGateway
- Auto shutdown idle instances => target JupyterAppServer
Let setup the first case:
- Step 1. Prepare the script, for example, a script to install pyarrow
#!/bin/bashset -eux# PARAMETERSPACKAGE=pyarrowpip install --upgrade $PACKAGE
- Step 2. If deploy via CDK or CLI, need to convert the bash to based 64 text
If we create life cycle configration in console, just paste the bash command directly to editor in SageMaker console.
LCC_CONTENT=`openssl base64 -A -in install-package.sh`
As we want to install libraries for the underlying SageMaker kernel, we will target this life cycle configuration to KernelGateway
aws sagemaker create-studio-lifecycle-config \--studio-lifecycle-config-name install-pip-package-on-kernel \--studio-lifecycle-config-content $LCC_CONTENT \--studio-lifecycle-config-app-type KernelGateway
-
Step 3. Attach the life cycle configuration to either domain or user profile level
-
Step 4. To make sure it work, either stop and start apps again
Similarly, follow the same procedure to setup a shutdown script for SageMaker studio at domain or user profile level. Please note that we have to target JupyterAppServer in this case instead of KernelGateway. auto-shutdown-script.sh
Notebook LSP#
- Select correct environment
- Install wanted packages
- Pre-installed by life cycle configuration
As recommended by the docs, install from Notebook is the best because it ensure the correct environment selected
%pip install pyarrow
It is possible to isntall from teriminal, but we need to activate the correct environment first
conda activate studio
Then install wanted packages, or entire script
pip install jupyterlab-code-formatter black
Then restart the jupyter server, wait for the terminal closed and refresh the browser notebook
restart-jupyter-server
Some useful command with conda in the Jupyter Server (note the Kernel). For example to list environment
conda env list
To list packages installed in an environment
conda list -n studio