
Introducion#
GitHub this note shows
- How service acocunt works
- Example 1: EBS CSI Driver add-on
- Example 2: ADOT-Collector for Fargate
Service Account#
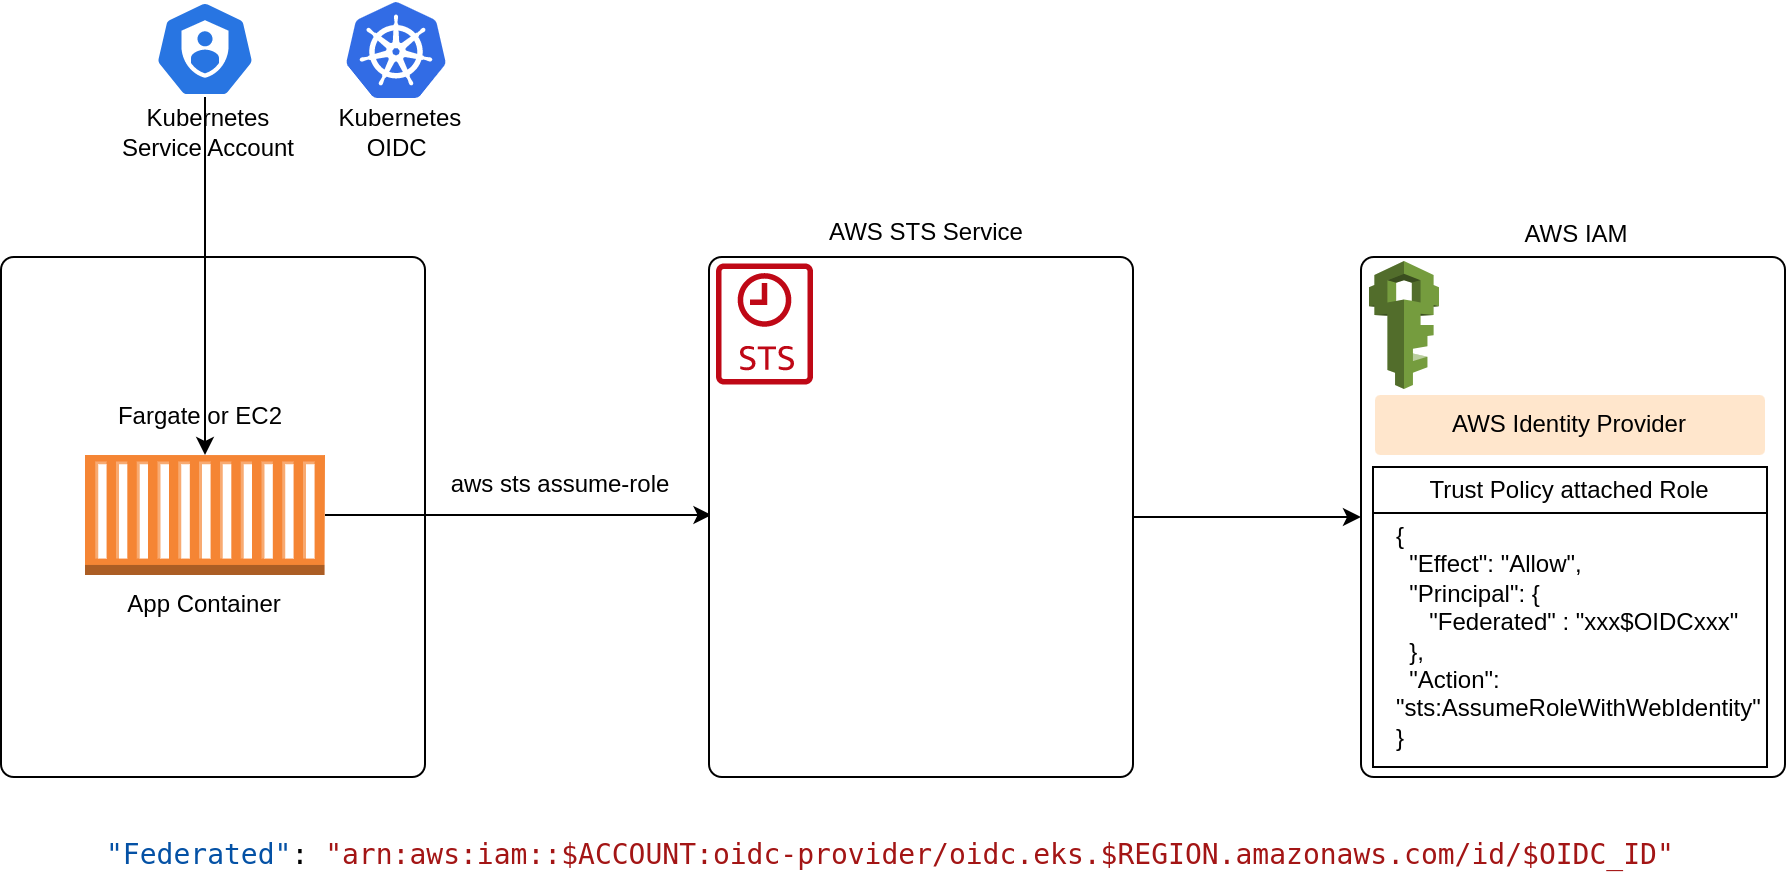
Quoted from docs: A Kubernetes service account provides an identity for processes that run in a Pod. There are some use cases to understand
- A process in a pod want to access data in S3, DynamoDB
- ALB Controller create a ALB controller in AWS
- Amazon EBS CSI Drive add-on creates presistent storate (EBS volumnes) in AWS
- Auto Scaler trigger Auto Scaling Group in AWS
Essential components when setting up a service account for Kubernetes. In short, a service account in Kubernetes need to assume an IAM role to access to AWS services.
- OIDC Identity: the EKS cluster should have an OpenID Connect provider
- IAM Identity Provider (IAM OIDC Provider)
- Trust Policy: the process should be able to assume a role in AWS IAM
- Service Account: create a service account in Kubernetes
- Service Account: annotate the service account with the IAM role arn
Let consider two example
- Example 1: setup permissions for the EBS CSI Driver add-on
- Example 2: setup permissions for ADOT-Collector
EBS CSI Driver#
In example 1, the driver need to create EBS volumnes in AWS services.
- Step 0. Install the EBS CSI Driver add-on
- Step 1. Create a service account in Kubernetes
- Step 2. Create Identity Provider in AWS IAM
- Step 3. Create an IAM role in AWS IAM
Step 1. Create a service account in Kubernetes. In this case, the service account ebs-csi-controller-sa already created when installing the add-on.
apiVersion: v1kind: ServiceAccountmetadata:annotations:eks.amazonaws.com/role-arn: arn:aws:iam::$ACCOUNT:role/AmazonEKS_EBS_CSI_DrivercreationTimestamp: '2023-05-13T06:11:46Z'labels:app.kubernetes.io/component: csi-driverapp.kubernetes.io/managed-by: EKSapp.kubernetes.io/name: aws-ebs-csi-driverapp.kubernetes.io/version: 1.18.0name: ebs-csi-controller-sanamespace: kube-systemresourceVersion: '66136'
Step 2. Create Identity Provider in AWS IAM
eksctl utils associate-iam-oidc-provider \--cluster=$CLUSTER_NAME \--approve
Step 3. Create an IAM role to be assumed by the service account
For example, create a role for the EBS CSI add-on. First, create a trust policy to allow the ID (OpenID Connect) assume the role
{"Version": "2012-10-17","Statement": [{"Effect": "Allow","Principal": {"Federated": "arn:aws:iam::$ACCOUNT:oidc-provider/oidc.eks.$REGION.amazonaws.com/id/$OIDC_ID"},"Action": "sts:AssumeRoleWithWebIdentity","Condition": {"StringEquals": {"oidc.ek$REGION.amazonaws.com/id/$OIDC_ID:aud": "sts.amazonaws.com","oidc.ek$REGION.amazonaws.com/id/$OIDC_ID:sub": "system:serviceaccount:kube-system:ebs-csi-controller-sa"}}}]}
Second, add policies to the role, for example AWS managed AmazonEBSCSIDriverPolicy policy to the role. Alternatively, it is possible to us eksctl here
eksctl create iamserviceaccount \--name ebs-csi-controller-sa \--namespace kube-system \--cluster my-cluster \--attach-policy-arn arn:aws:iam::aws:policy/service-role/AmazonEBSCSIDriverPolicy \--approve \--role-only \--role-name AmazonEKS_EBS_CSI_DriverRole
ADOT-Collector#
In example 2, the collector running in Faragte need permissions to send logs to AWS CloudWatch.
- Step 1. Create service account in Kubernetes
- Step 2. Create Identity Provider in AWS IAM
- Step 3. Create a Role in AWS IAM
By using eksctl, three step can be done in two commands below. Under the hoold, eksctl will create a Lambda function which call kubernetes API server.
#!/bin/bashCLUSTER_NAME=EksClusterLevel1REGION=ap-southeast-1SERVICE_ACCOUNT_NAMESPACE=fargate-container-insightsSERVICE_ACCOUNT_NAME=adot-collectorSERVICE_ACCOUNT_IAM_ROLE=EKS-Fargate-ADOT-ServiceAccount-RoleSERVICE_ACCOUNT_IAM_POLICY=arn:aws:iam::aws:policy/CloudWatchAgentServerPolicyeksctl utils associate-iam-oidc-provider \--cluster=$CLUSTER_NAME \--approveeksctl create iamserviceaccount \--cluster=$CLUSTER_NAME \--region=$REGION \--name=$SERVICE_ACCOUNT_NAME \--namespace=$SERVICE_ACCOUNT_NAMESPACE \--role-name=$SERVICE_ACCOUNT_IAM_ROLE \--attach-policy-arn=$SERVICE_ACCOUNT_IAM_POLICY \--approve